Sunday, June 12, 2011

Spring Crown Royal


Another sure sign of spring is asparagus. Asparagus is available year round in the supermarket but in New England you will find the locally grown variety from late May to early June. Green asparagus is a great source of folic acid, with just ¼ cup providing one-third of the recommended daily intake.

When shopping for asparagus, whether in the supermarket or the farmer’s market, look for spears that snap, don't bend, and have nice, tight heads that are brightly colored. You may notice that some spears are plump, while others are skinny. The thicker stalks tend to be more tender while the thinner ones tend to be more flavorful. Obviously, the thicker the asparagus, the longer it will take to cook, so adjust any recipes accordingly. One isn't better than the other; it just depends which you prefer.

Once you bring the asparagus home, keep it fresh in the fridge for up to a week. Simply stand the stalks up in a glass with an inch or two of water in the bottom. To prepare asparagus, grasp each spear and bend it until it snaps. The spear will break at the natural point where it becomes tender. Asparagus is wonderful roasted or grilled (thicker variety works best for this) or lightly steamed and made into a soup. Try it with stir-fries or have it raw as a crudité.

The recipe below combines asparagus with spring onions. Spring onions are, as the name highlights, largely available in the spring. They are simply young regular onions that farmers pull from the field to thin the rows. You can differentiate them from scallions by their slight bulge near the root. They have a milder flavor than mature regular onions and are sweeter than scallions. They can be cooked and used as standard onions or leeks; better yet, maximize their tender, sweet flavor by using them raw in salads, salsas, and as a garnish. For this recipe I have caramelized them making their flavor even sweeter.


Asparagus and Caramelized Spring Onion Quiche

1 pie shell (home-made or store-bought)

½ tablespoon butter

1 cup spring onions, sliced (white part only – you can reserve the green part to use for stock)

1 ½ cups asparagus, chopped

6 eggs

¼ cup light cream

1 tablespoon chopped mint

Salt and pepper to taste

½ cup shredded sharp Vermont cheddar


Preheat oven to 375 degrees

Press the prepared pie dough into 9 inch pie dish. Set aside in the refrigerator as you prepare the quiche.

In a small sauté pan, melt butter over medium heat. Add sliced onion and sauté, stirring occasionally until onions begin to soften and turn brown – about 10 -15 minutes. Add chopped asparagus to pan and cook for an additional 2-3 minutes. Remove pan from heat and allow mixture to cool before adding to prepared pie shell.

In a medium bowl whisk together eggs and light cream. Add in the chopped mint and season with salt and pepper. Pour the egg mixture over the onion and asparagus mixture in the pie shell. Sprinkle the shredded cheese over the top.

Put the pie dish on a sheet pan and place in the oven. Bake until golden brown, and the egg mixture has set, 35 to 40 minutes. Be sure to rotate the quiche after 15 to 20 minutes to ensure even browning.

Thursday, June 2, 2011

Jump n' Chive


Fresh herbs are vital to cooking. One of the main reasons people over-salt their food is because it is lacking in flavor. Fresh herbs help to bring the flavor without all the added sodium, and I use them religiously. As Deborah Madison describes in her book Local Flavors, “Herbs can take a vegetable on the most amazing journeys, changing a food from savory to sweet and back again, and they can make one vegetable seem like five.” Try tossing fresh herbs into a salad or top a dish with chopped herbs to bring a final burst of freshness.

Many herbs are very hardy and will grow almost anywhere. Living in Boston, I was able to have a little container herb garden on my front stoop and they were very happy. Since moving to Vermont, I have the luxury of a little bit of land, so I planted a perennial herb garden last year. It is a great feeling to watch in the spring as these perennials come back to life. The first to show signs were the chives, which are now in full bloom

Chives are part of the allium family which includes garlic, onions, ramps, scallions, and leeks. Chives are best used fresh so having a patch in your yard or in a pot on your windowsill can make it easy to snip some herbs into your dish. If you’re not growing your own, fresh chives are readily available in the supermarket or at the farmer’s market in the spring. Cut chives can be stored in the refrigerator unwashed in a sealed plastic bag. Do not wash them before storing as the clinging water from washing can promote decay.

Many people just think of chives as a topping for baked potatoes which can make them sadly underused, but they impart a subtle onion flavor to many dishes. Use chives with cooked eggs; add them to soups or use as a topping for fish. The clover-like purple flowers are also edible and can be a wonderful addition to a salad or as a garnish.

I adapted this recipe from Deborah Madison’s Local Flavors.


Crostini with Chive Scented Ricotta

Makes 2 cups, enough for 20 crostini

This recipe is especially over the top if you use fresh home-made ricotta. The ricotta can also be used as a sauce for pasta or folded into an omelet or scrambled eggs.

2 cups cow’s milk or sheep’s milk ricotta

2 tablespoons olive oil

Sea salt and freshly ground pepper to taste

¼ cup finely snipped chives

Chive blossoms cut at the base

20 slices Red Hen Baguette

Mix the ricotta, oil, salt, pepper, and chives together. Toast the bread until golden, then spread the cheese on top. Add a tiny bit of additional pepper and a few chive blossoms to each slice.

Wednesday, May 25, 2011

Stradivarius of Spring


Fiddlehead season is coming to a close and if you have never experienced these curled little wonders, you don't know what you are missing. These delicacies of spring are the young furled fronds of the ostrich fern and have a very short season for picking in April and May.

Fiddleheads are versatile and easy to use. They have a mild taste reminiscent of Asparagus with a bit of a nutty bite that makes them unique. Fiddleheads can be used in similar ways to any firm green vegetable such as Asparagus or Broccoli florets, but to bring out their best flavor I think they are best simply sauteed with some olive oil and garlic or fried (see recipe below).

Fiddlehead ferns are a good source of vitamins A, C, and fiber. They should not be eaten raw as they have a slight bitterness until cooked and may cause stomach upset if eaten raw in large quantity.

If more than 2 inches of stem remains attached beyond the coiled part of the fiddlehead snap or cut it off. Make sure you wash your fiddleheads thoroughly and remove the brown papery chaff which may still remain. To cook fiddleheads simply bring a small amount of lightly salted water to a boil, add washed fiddleheads, and cook them at a steady boil for 8-10 minutes. Fiddleheads can also be washed clean and steamed for 20 minutes. The sooner they are eaten, the more delicate their flavor.

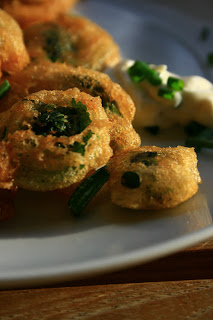
I rarely deep fry food, but I find that frying locks in the fiddlehead's unique flavor. They only come around once a year - so I say, "Why not treat yourself to some deep-fried goodness?"

Beer Battered Fried Fiddleheads with a Garlic and Chive Mayo Dipping Sauce


For Garlic and Chive Mayo Dipping Sauce

1 cup mayonnaise

2 cloves garlic, finely chopped

1 tablespoon chives, chopped

salt and pepper to taste

1/2 tablespoon lemon juice

In a small bowl, mix together all ingredients. Cover and refrigerate for at least 30 minutes to let flavors blend. Serve alongside fried fiddleheads as a dipping sauce.

For Fiddleheads

1 cup flour

6 ounces beer (I used Magic Hat's Spring Vinyl)

2 teaspoons baking powder
salt and pepper to taste

Canola oil for frying

1/2 lb fiddleheads, washed and trimmed

1. Whisk together flour, baking powder, and salt pepper in a bowl.
2. Slowly whisk in beer until batter is just barely thick.

3. Heat 2 inches of oil in a large sauteed pan over medium heat.
4. Dip fiddleheads into the batter, removing any excess and place in hot oil.
5. Cook both sides until golden brown (about 3-4 minutes per side).
6. Remove cooked fiddleheads with a slotted spoon and drain on plate covered with a paper towel.
7. Serve with chilled dipping sauce.


Recipe Copyright In Season Personal Chef and Nutrition Services, LLC

Monday, May 2, 2011

I'm Baaack!


A couple part-time jobs and a puppy, who was quite an adorable handful, have side-tracked me over the past year. Things are finally settling down and the urge to document my recipes and photos has returned. A fantastic new book has also helped to get me back on track. The book is called Plate to Pixel: Digital Food Photography & Styling by Helene Dujardin, which takes you through the art and techniques of food photography. The photography is rather inspiring so you can expect to hear from me again very soon.


Saturday, December 19, 2009

What's up Doc? Carrot Heaven


I received some of the sweetest carrots I have ever had this year from our winter CSA. Due to the cold weather, winter storage carrots develop a wonderful sweetness that sets them apart from the flavorless store-bought carrots. Carrots come in a variety of colors such as the Purple Haze and Yellow Stone Varieties or the Bolero variety which is perfect for winter storage. Because these carrots are organic, I leave that flavorsome thin skin on. If you are buying store-bought, non-organic carrots I highly recommend peeling them due to the large amount of pesticides used to grow them.

To highlight the carrots' sweetness, I adapted a recipe for Curried Carrot Almond Soup from the now defunct Gourmet Magazine. I used homemade chicken stock and added some different spices than the Gourmet Magazine recipe. This is a velvety pureed soup which is low fat but certainly doesn't taste like it. The addition of unsweetened almond milk gives it a delectable creaminess. You can easily make this soup vegan by switching the chicken stock to vegetable stock or water. As everything is going to be pureed you don't need to spend too much time on finely chopping the ingredients which makes this a quick and easy soup that tastes like you spent all day in the kitchen. I substituted pine nuts for the almonds. Garnishing with cilantro and toasted nuts really added to the balance of this soup so try not to skip this step.


Curried Carrot Almond Soup

2 tablespoons olive oil
1 small onion, thinly sliced
2 pounds carrots, washed and sliced
2 cloves garlic, chopped
1 1/2 teaspoons curry powder
1/2 teaspoon ground coriander
1/2 teaspoon ground fennel seed
1/4 teaspoon ground ginger
4 cups chicken stock
2 cups plain unsweetened almond milk
1-2 teaspoons lemon juice
Salt and pepper to taste
1/3 cup toasted almonds for garnish
1/4 cup chopped cilantro for garnish


  1. Heat olive oil in a heavy 4-quart stock pot over medium heat. Add onion and saute, stirring occasionally until onions are soft, about 5-7 minutes.
  2. Add sliced carrots and saute for about 5 minutes to help release some of their sweetness.
  3. Add chopped garlic, curry powder, ground coriander, ground fennel, ground ginger, salt and pepper and saute for an additional 1-2 minutes.
  4. Add in chicken stock and almond milk and simmer partially covered, stirring occasionally , until carrots are tender, about 15-20 minutes.
  5. Let the soup cool slightly then blend soup in batches in a blender until smooth (use caution when blending hot liquids). Adjust seasoning with salt and 1-2 teaspoons of lemon juice.
  6. Serve sprinkled with cilantro leaves and toasted almonds.

Wednesday, December 16, 2009

Spanish Tortilla


I received some beautiful red skinned, red flesh potatoes from my CSA along with some kale and red onions. I had the cheddar cheese and eggs on hand so decided to whip together a Spanish Tortilla. When most people hear "tortilla" they think of the flat bread used to wrap burritos or tacos, but the Spanish tortilla couldn't be more different. It is actually an egg omelet made with potatoes and other vegetables may be added (similar to the Italian Fritatta). When making egg dishes such as omelets, tortillas, frittatas or quiche, any filling should be cooked before being added to the eggs. This will prevent you from having a watery egg dish and it also allows you a chance to add some more flavors to your dish such as herbs and spices.

Spanish tortillas are a great economical choice for any time of the day. It can be served hot or cold. I have taken a classic Spanish tortilla recipe and given it a Vermont twist. In this recipe I added some sauteed kale for some extra fiber, folate, and iron and some cheddar cheese instead of Manchego.

I've found one of the most important pieces of equipment when making a Spanish tortilla is the pan you use. It MUST be non-stick or else you will end up with a scrambled mess on your hands.


2 tablespoons and 1 teaspoon olive oil
2 cups chopped fresh kale, stems removed
1 clove garlic, minced
1-2 tablespoons water
1 pound red potatoes, thinly sliced
1/2 medium onion, sliced
1 teaspoon smoked paprika
6 large eggs
1/4 cup shredded cheddar
Salt and pepper to taste

  1. In a medium sized non-stick skillet, heat 1 teaspoon of olive oil over medium heat. Add minced garlic and chopped kale to heated oil and saute for 5-10 minutes or until the kale becomes tender. Add 1-2 tablespoons of water if the kale begins to stick to the pan. Season with salt and pepper, remove from pan and let cool.
  2. Wipe out the pan and then add 1 tablespoon of olive oil. Heat over medium heat and add sliced potatoes. Cook potatoes until they begin to soften, about 10-15 minutes.
  3. Add in sliced onions and paprika and cook for an additional 2-3 minutes or until onions are translucent. Season with salt and pepper. Remove cooked potatoes and drain on paper towels to remove excess oil.
  4. In a large bowl, whisk together eggs. Mix in grated cheese and season with salt and pepper. Add in cooked potatoes and kale mixture. Mix together and let sir for about 5 minutes to allow the potatoes to absorb some of the egg.
  5. Heat cleaned non-stick skillet over medium-low heat and add remaining tablespoon of olive oil. Once oil is hot, pour in egg and potato mixture. As the edges set, lift them away from the side of the pan and tilt the pan to let uncooked egg flow underneath. When the tortilla is mostly set, place an inverted plate a little larger in size than the pan, hold them firmly together, and turn the pan upside down on top of the plate. (Protect the hand holding the plate with a towel or pot holder.) Slide the tortilla back in the pan and cook for another 2 to 3 minutes and then slide onto a plate.
  6. Another way to cook the tortilla is to finish it in the oven as long as the pan you are using is oven-proof. Preheat the oven to 350 degrees F. Start the tortilla on top of the stove, as above. After a couple of minutes, put the pan in the oven and cook until the tortilla is set on top, about 7 to 10 minutes.
  7. Slice into wedges and serve.
Copyright In Season Personal Chef and Nutrition Services, LLC

Monday, November 23, 2009

Party Dip

I recently taped a segment for UVM Extension's "talk show", Across the Fence. During this segment I highlighted a white bean dip which is a sure crowd pleaser. It is a versatile dip which can be used along with crudites (cut up vegetables), spread on crostini, or used as a replacement for mayonnaise on a sandwich. It's high in fiber and protein, low in fat, and rich in flavor. Play around with the garlic and lemon levels to adapt to your tastes. Along with the dip I have included a quick recipe for homemade whole wheat pita chips - a great alternative to high fat chips. The pita chips work great with this white bean dip as well.

White Bean Dip with Rosemary and Lemon

Yields ~2 cups


1, 15-ounce cans of white beans such as cannellini or great northern beans
1-2 cloves garlic, peeled
2 tablespoons olive oil
1 teaspoon lemon zest
2-3 tablespoon lemon
1 tablespoon fresh rosemary minced
Salt and pepper to taste

1. Thoroughly rinse the beans in a colander to remove excess sodium.

2. Place garlic cloves in food processor and pulse until finely minced.

3. Add rinsed beans, olive oil, lemon juice, salt and pepper to the food processor. Puree until smooth.

4. Add fresh minced rosemary and lemon zest and pulse the food processor a couple of times until seasonings are well incorporated.

5. Cover and place in the refrigerator for about an hour to let the flavors blend. Can be stored in the refrigerator for up to a 1 week.


Pita Chips

Makes about 6 Servings

3 Pita Round
Olive Oil Cooking Spray
Salt and Chili Powder to taste

  1. Preheat oven to 350 degrees F.
  2. Split pita rounds in half and make 6 rounds. Stack the rounds one on top of the other and cut into 6 wedges.
  3. Spread wedges in a single layer on a baking sheet, lightly spray with cooking spray and bake until golden, about 10 minutes.
  4. As soon as pita chips are removed from oven, season with salt and chili powder, let cool and enjoy!